Introduction
Partitioning splits a secondary storage device, such as a hard disk or an SSD, into multiple independent parts. Disk partitions allow users to set up multiple file systems on the same machine, simplify the backup procedure, and improve system security.
In this step-by-step tutorial, you will learn how to create a partition in Linux using the parted and fdisk commands.
Prerequisites
- A system running Linux.
- Command-line access.
- A user with administrative privileges.
Partition Disk Using fdisk Command
fdisk is a command-line disk partitioning tool that is part of the util-linux utility package. It enables users to create, manage, and delete disk partitions via a dialog-driven interface.
Follow the steps below to partition a disk in Linux using fdisk.
Step 1: List Disks and Partitions
Inspect the current drive structure before making changes to the system's partition table. Run the following command to list all existing disks and partitions:
sudo fdisk -lThe example output below shows two disks, /dev/sda and /dev/sdb. The first storage disk, /dev/sda, has been formatted already and contains the operating system. The second disk, /dev/sdb, contains unallocated space only.
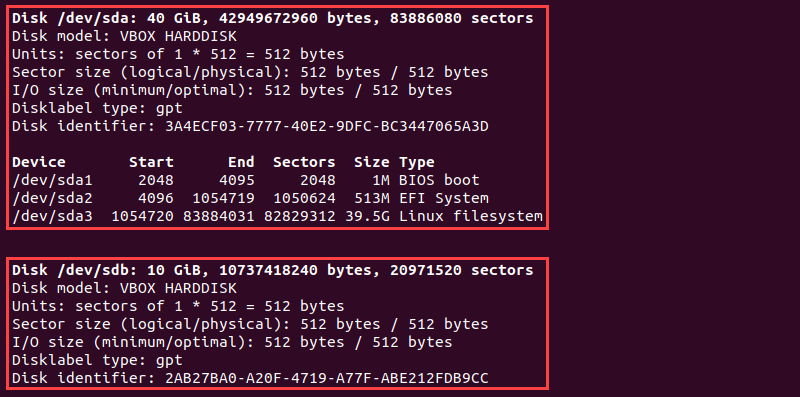
Choose an unpartitioned disk on your system and proceed with the next step.
Step 2: Select Storage Disk
To select the storage disk for partitioning, run the following command, replacing [disk-name] with the actual storage disk name.
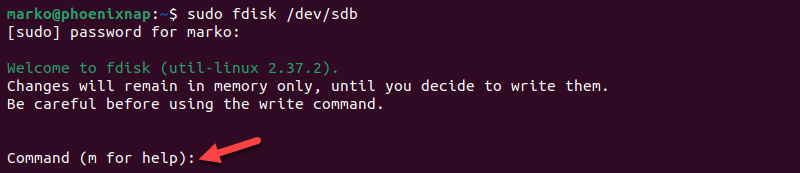
sudo fdisk [disk-name]The fdisk utility displays a welcome message and opens a shell prompt.
Step 3: Create New Partition
The fdisk shell prompt accepts one-letter commands that perform disk management functions or start a dialog for multi-step procedures. To create a new partition on an empty storage disk, proceed with the steps below.
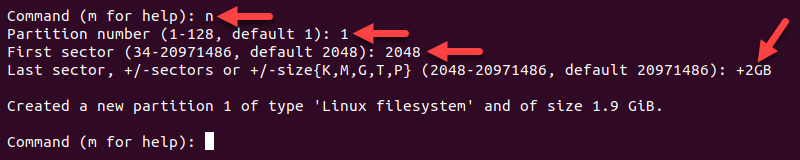
1. Run the n command to start partition creation.
2. Select the partition number. If unsure which number to select, proceed with the default option.
3. Enter the first sector of the partition. Typing the default number ensures that the partition starts at the beginning of the disk or where the previous partition ends.
4. Type the last sector of the partition. The partition size can also be expressed in megabytes or gigabytes. For example, type +2GB to create a 2GB partition.
A message appears confirming that the partition is created.
Step 4: Write on Disk
Executing the procedure described in the last step creates the partition, but the changes must still be written onto the disk. To write the changes, run the w command.
The output confirms that the partition table has been altered.

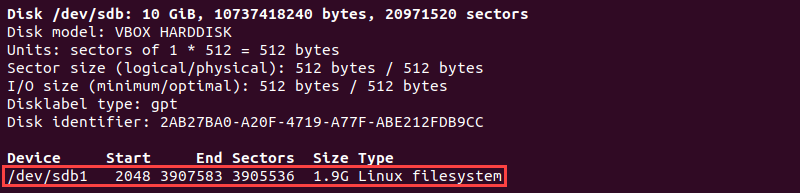
Verify that the partition is created by entering:
sudo fdisk -lThe new /dev/sdb1 partition is now visible in the partition list.
Partition Disk Using parted Command
Parted is a GNU utility for creating and manipulating partition tables, an alternative to fdisk. Follow the steps below to partition a disk in Linux by using the parted command.
Step 1: List Disks and Partitions
Before starting the partitioning process, list available storage devices to identify the disk to partition. Run the following command to list storage devices:
sudo parted -lThe example below shows two storage devices (/dev/sda and /dev/sdb):
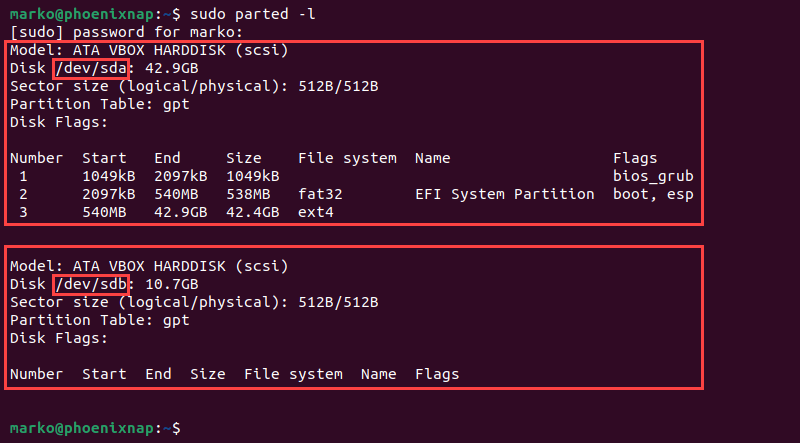
The terminal prints the following information about each device:
- Storage device model.
- Name and size of the disk.
- The logical and physical size of the memory sectors. Not to be confused with available disk space.
- Type of partition table (msdos, gpt, aix, amiga, bsd, dvh, mac, pc98, sun, or loop).
- Partition list with information on size, type, file system, and flags.
Warning: The first storage disk (dev/sda or dev/vda) usually contains the operating system. Creating a partition on this disk can make the system unbootable.
Step 2: Select Storage Disk
Select the storage disk to partition by running the following command:
sudo parted [disk-name]For example, to partition /dev/sdb, type:
sudo parted /dev/sdbThe parted shell prompt appears.

Note: To select a different disk from within the parted shell, type select [disk-name].
Step 3: Create Partition Table
Create a partition table before partitioning the disk. A partition table is located at the start of a storage drive, and it contains data about the size and location of each partition.
The partition table types are aix, amiga, bsd, dvh, gpt, mac, msdos, pc98, sun, and loop. The two most commonly used types are gpt and msdos. The recommended choice is gpt, which supports up to 9.4 zettabytes (9.4 billion terabytes) of partition space and up to 128 partitions.
To create a partition table, enter the following:
mklabel [partition-table-type]For example, to create a gpt partition table, use:
mklabel gptType Yes when prompted to apply the change.

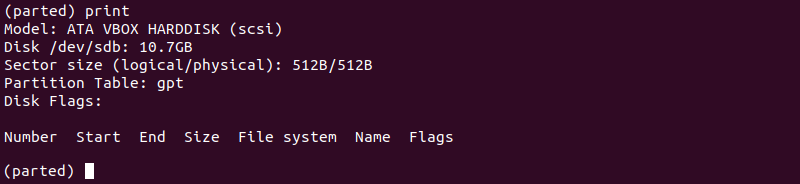
Step 4: Check Table
Run the print command to review the changes. The output displays information about the storage device:
Note: Run help mkpart command to get additional help creating a new partition.
Step 5: Create Partition
Parted requires the user to specify the partition type, the file system, and the partition size to create a partition. Partitions in Linux can be of the following types:
- Primary. Holds the operating system files. Only four primary partitions can be created.
- Extended. A type of partition in which more than the four primary partitions can be created.
- Logical. A partition residing inside an extended partition.
To create a new partition, enter the following mkpart command:
mkpart [partition-type] [file-system] [disk-start] [disk-end]For example, the command below creates a new primary 1854MB partition using the ext4 file system with the assigned disk starting at 1MB and ending at 1855MB:
mkpart primary ext4 1MB 1855MBRun the print command to review information on the newly created partition. Locate the information in the Disk Flags section:
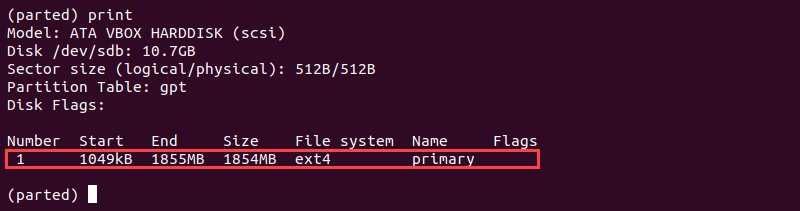
Note: In a gpt partition table, the partition type is also the mandatory partition name.
To save your actions and quit, enter the quit command. Parted saves changes automatically.

The "You may need to update /etc/fstab file" message suggests that the partition can be automatically mounted at boot with /etc/fstab.
Format Partition
After creating a partition using the parted or fdisk command, format it before use. To format a partition, run the following mkfs command:
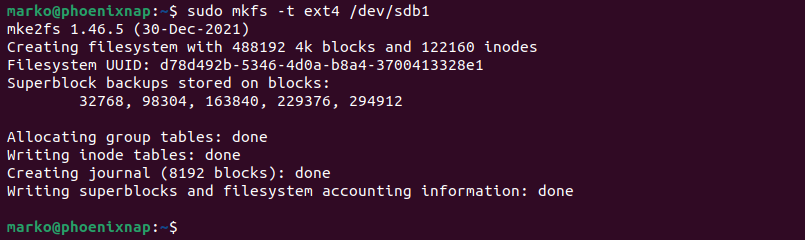
sudo mkfs -t [file-system] [partition]For example, to partition the /dev/sdb1 partition with the ext4 file system, type the following:
sudo mkfs -t ext4 /dev/sdb1The mkfs utility formats the partition and confirms the success of the operation.
Note: Check out our guide and learn how to format and mount disk partitions in Linux.
Mount Partition
The formatted partition is unusable until you mount it. To begin interacting with the disk, create a mount point and mount the partition to it:
1. Create a mount point in the mnt directory by running the following command:
sudo mkdir -p /mnt/[directory-name]2. After that, mount the partition by entering:
sudo mount -t auto [partition-name] /mnt/[directory-name]For example, to mount the /dev/sdb1 partition to the /mnt/sdb1 directory, type:
sudo mount -t auto /dev/sdb1 /mnt/sdb1The terminal does not print an output if the operation is successful.
3. Verify if the partition is mounted by using the following df command:
df -hT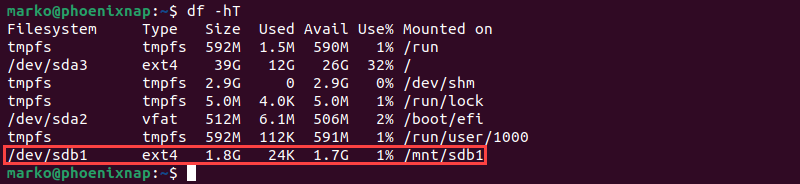
Note: If you have NTFS partitions on your hard drive, check out our article on how to mount NTFS partitions in Linux.
Conclusion
After following this step-by-step tutorial, you should better understand how to partition a disk in Linux by using the parted or fdisk command. The article also described the procedure for formatting and mounting partitions in Linux.
For more Linux commands, see our Linux Commands Cheat Sheet.
