Introduction
Tmux is a Linux application that allows multitasking in a terminal window. It stands for Terminal Multiplexing, and is based around sessions. Users can start a process, switch to a new one, detach from a running process, and reattach to a running process.
In this Tmux tutorial learn how to install tmux, commands with examples, and how to use.

Prerequisites
- A Linux-based system
- A user account with sudo or root privileges
- Access to a terminal window / command line
How to Install tmux
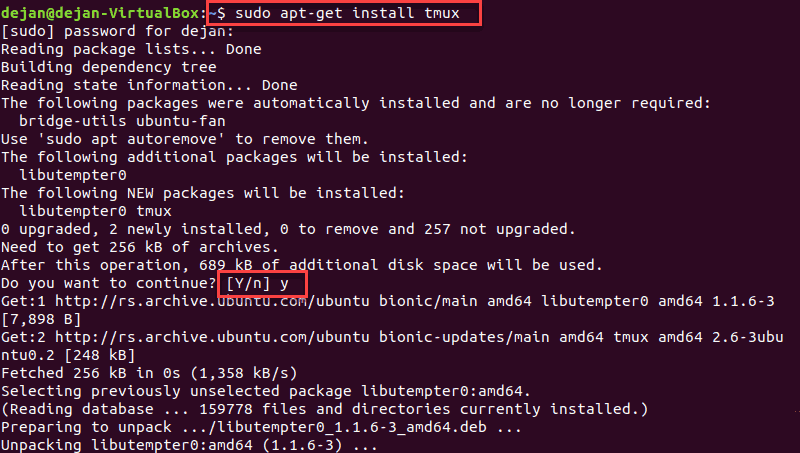
To install Tmux using default repositories, run the installation command using the system’s default package manager.
Install Tmux on Ubuntu and Debian
sudo apt-get install tmux
Install Tmux on RedHat and CentOS
sudo yum install tmuxtmux Commands
In Tmux, you will be working with sessions, windows and panes.
- Sessions define the general task at hand. For example, if you are testing something, stick to a single session for all activities related to your test.
- Windows are for specific activities or projects within a session.
- Panes help you create multiple views within one window. For example, you might be working something in one pane, and using the other to track error logs.
Use tmux panes, windows and sessions to organize your tasks in a logical manner.
Tmux is controlled by pressing CTRL+b, followed by a hotkey. The commands below are the ones most commonly used.
Note: tmux command usage may differ from version to version. Your tmux version might not support all of the commands listed below. For more information see the official tmux changelog.
Start New tmux Session
To start a new session, in a terminal window type:
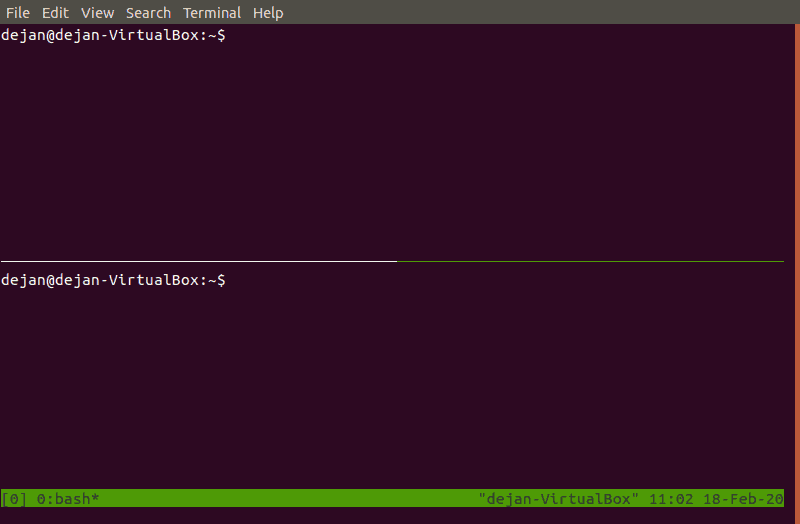
tmuxYour screen will change and display a status bar at the bottom. In the lower-left, you’ll see the name and number for the window: [0] 0:bash*
In the lower-right, the date and time are displayed. Just beside the date and time, you’ll see the logged-in user and host: username@host-server
Start a New Named Session
To start a new named session, type the following command:
tmux new -s session_nameInstead of session_name, type the name you want assign to the session.
Split Pane tmux
Tmux allows splitting the screen both horizontally and vertically.
Split the screen horizontally: CTRL+b+"

Split the screen vertically: CTRL+b+%
Exit tmux Pane
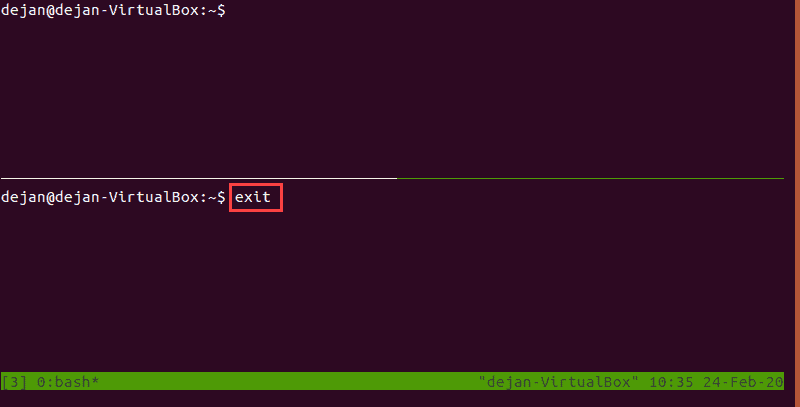
If you need to exit a pane, just type exit and press Enter. Alternatively, press CTRL+d. The currently selected pane will close.

Moving Between Panes
The pane you’re working in is highlighted in green. To toggle between panes, use CTRL+b+o.
Tmux assigns a number to each pane. You can quickly press the number of a pane to switch to it. For example, CTRL+b+q will display the numbers, then quickly pressing 1 will switch to pane 1.
Resize Panes
You can change the size of each pane. To do so, press CTRL+b+:.
The bottom bar will change from green to yellow. Now you can type a command to resize the pane:
resize-pane -D – Moves the boundary line for the pane downward.
resize-pane -U – Moves the boundary line for the pane upward.
resize-pane -R – Moves the boundary line for the pane right.
resize-pane -L – Moves the boundary line for the pane left.
You may also specify a specific number of cells to move the boundary line. For example:
resize-pane -U 10 – Moves the boundary line up 10 cells.
You can specify a different cell than the one you’re working in. To resize Cell 2 (lower right):
resize-pane –t 2 --R 5 – Moves the boundary line 5 cells to the right.
Resizing has a couple of considerations. First, resizing only works on the boundary line between cells. If the cell doesn’t have a boundary line, the command won’t work. For example, trying to resize the upper cell right won’t work, because it’s already the full width of the screen.
Second, resizing a shared boundary line can change the size of another cell. For example, moving the upper boundary line of cell 1 will also change the size of cell 2.
Zoom in to Pane
Zooming into a pane works just like maximizing a window in a graphical interface (GUI).
Press CTRL+b+: and type resize-pane -Z.
This will expand the current pane. Use the same command to set it back to normal.
Detaching and Reattaching
Tmux can be used to keep a process working in the background. You can detach from the current session by typing:
tmux detachYour system will drop to a normal command line. There should be an output that reads [detached (from session X)].
You can re-attach to the session by typing:
tmux attachThe system will re-enter the live tmux session, and pick up just where you left off.
To attach to a specific named session:
tmux a -t session_nameInstead of session_name, type the real name of the session.
Note: If you’re connected remotely to a Linux server with SSH, this is a handy way to preserve a session. You can detach from the session on one computer, switch to a second computer, and reconnect to the server, and re-attach to the same session. Unlike some other applications, tmux runs remotely on the server.
List Active Sessions
To list all active sessions type tmux ls and hit Enter.

Working With Windowed Screens
Your screen can become cluttered if you have too many panes open. Create a new full-screen window by entering CTRL+b+c.
Rename Window
To rename a window, switch to it and use the comma key: CTRL+b+,
The status bar at the bottom will change color to yellow. You can backspace to delete the existing name, then type a new name for this window.

Switch Between Windows
To switch to the next window in order press: CTRL+b+n
To switch to the previous window press: CTRL+b+p
Display List of Windows
You can display an interactive list of windows with CTRL+b+w.
Use the up/down arrow keys to select the window you want to use, then press enter.
Closing a Window
Close a tmux window with CTRL+b+&. Confirm your choice by typing y.

Closing all windows will exit tmux.
How to Use and Configure tmux
Like most Linux applications, tmux is highly configurable. Edit the tmux.conf file to make changes.
Your system may not have a tmux.conf file by default. To create custom changes for a single user, create the file in the user’s home directory ~/.tmux.conf. To create system-wide changes, create the file in the system directory /etc/tmux.conf.
Change Activation Key
By default, tmux uses the CTRL+b combination to activate functions. To change it, edit the configuration file with a text editor of your liking. We will be using nano:
sudo nano /etc/tmux.confAdd the following lines:
unbind C-b
set –g prefix C-a
Save the changes and exit. Now, whenever you use tmux, you’ll use CTRL+a to activate functions.
Note: If you have any active tmux sessions, the changes won’t take effect until they are closed and restarted. Detaching will not work.
Change Keys to Split Panes
You can remap function keys. Open the /etc/tmux.conf file for editing:
sudo nano /etc/tmux.confAdd the following lines:
unbind %
bind h split-window –h
unbind ‘“‘
bind v split-window –v
Save and exit. This remaps the horizontal split to CTRL+b+h, and the vertical split key to CTRL+b+v.
Note: You can remap any function key in this manner. Use single-quote signs around a key to make sure the system interprets it correctly.
Change Status Bar Appearance
Open the configuration file for editing:
sudo nano /etc/tmux.confAdd the following lines:
# Status bar colors
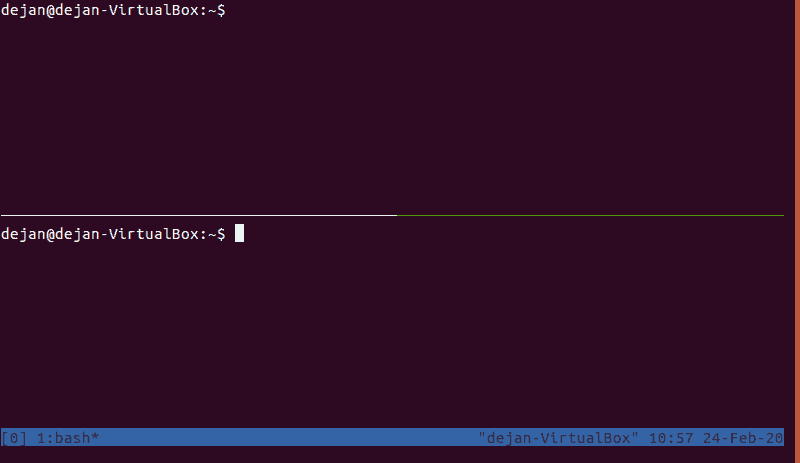
set –g status-bg blue
set –g status-fg black

# highlight and display
setw –g monitor-activity on
setw –g visual-activity on
You may use a numerical code (0 – 255) to specify a color. The # sign marks a comment, which is used to explain the change. This lets you make notes without the system reading the text as code.
Save the changes and exit the file.

Note: Learn how to comment in Bash along with some of the best practices you should know about.
Change Pane Numbering
Open and edit the tmux configuration file:
sudo nano /etc/tmux.confAdd the following lines:
# Start window numbering at 1 instead of 0
set –g base-index 1

# Start pane numbering at 1 instead of 0
set –g pane-base-index 1
Now when you display the windows or panes, numbering will start at 1 instead of 0.
Save the changes and exit the file.
Conclusion
In this extensive tmux tutorial, you have learned how to install tmux as well as work with multiple sessions, panes, and windows. Additionally, you have learned how to configure tmux to your liking.
Undoubtedly, tmux adds a handy set of features to your terminal window. Options like windowing and reattaching to a session make it a powerful tool.